
Fishing rod guides are crucial for smooth line management and casting performance. Replacing them ensures optimal functionality‚ preventing tangles and improving accuracy. This process is a common DIY task for anglers‚ requiring proper tools and techniques to maintain rod efficiency and longevity.
1.1 Importance of Fishing Rod Guides
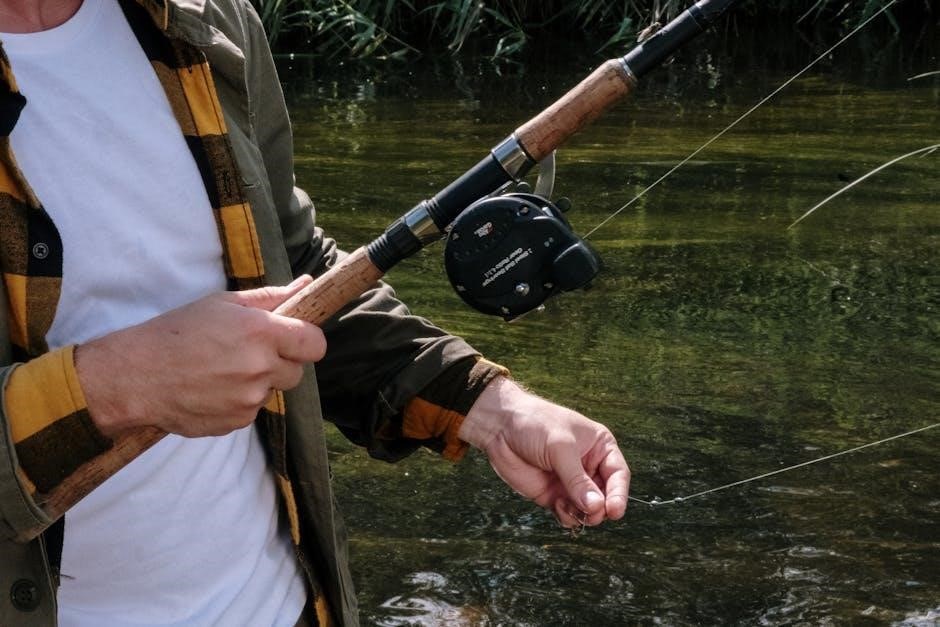
Fishing rod guides play a vital role in ensuring smooth line management and casting performance. They minimize friction‚ preventing line wear and tangles‚ while also protecting the rod from abrasion. Properly functioning guides enhance casting accuracy‚ distance‚ and control‚ making them essential for both novice and experienced anglers. Their placement and quality directly impact the overall fishing experience‚ emphasizing the need for regular inspection and timely replacement to maintain optimal rod functionality.
1.2 Why Guides Need Replacement
Fishing rod guides need replacement due to damage from corrosion‚ wear and tear‚ or accidental impacts. Corrosion‚ especially in salty environments‚ weakens metal guides. Frequent use causes friction‚ leading to wear. Accidents can misalign or break guides‚ affecting line management. Upgrading to better materials or designs for new fishing conditions may also necessitate replacement. Regular maintenance helps identify when guides are no longer functional‚ ensuring optimal rod performance and preventing further issues.

Tools and Materials Needed for Replacement
Essential tools include a utility knife‚ cutting pliers‚ and sandpaper. Materials needed are new guides‚ epoxy adhesive‚ and cleaning solvent. Tweezers and a measuring tape are also useful.
2.1 Essential Tools for the Job
The replacement process requires specific tools to ensure precision and efficiency. A utility knife is necessary for removing old guides and cutting excess adhesive. Sandpaper helps smooth the rod surface‚ preparing it for new guides. Cutting pliers are useful for trimming guide feet or removing stubborn hardware. Epoxy adhesive is essential for securing the new guides firmly. A cleaning solvent ensures the rod surface is free from dirt and oils. Optional tools include tweezers for precise guide placement and a measuring tape to align guides accurately.
2.2 Recommended Materials for Guides
Choosing the right materials for fishing rod guides is essential for durability and performance. Stainless steel frames with ceramic or titanium inserts are popular due to their resistance to corrosion and wear. Ceramic inserts are ideal for reducing friction and preventing line wear‚ while titanium offers exceptional strength-to-weight ratio. High-quality epoxy adhesives are crucial for securing guides firmly. For saltwater fishing‚ consider guides made from marine-grade materials to withstand harsh conditions. Selecting the right materials ensures long-lasting performance and enhances your fishing experience.
Step-by-Step Guide to Replacing Fishing Rod Guides
Replacing fishing rod guides involves careful preparation and precise execution. Start by gathering tools like cutting pliers‚ adhesive‚ and new guides. Remove old guides by cutting the adhesive and gently twisting them off. Clean the rod surface thoroughly to ensure a strong bond. Apply a small amount of adhesive to the new guide and align it properly with the rod’s spine. Secure it firmly and let it dry completely before using the rod. This process ensures optimal performance and longevity of your fishing rod.
3.1 Preparing the Rod for Replacement
Before replacing the guides‚ inspect the rod for any debris or residue. Remove the reel and line to prevent interference. Clean the rod surface with a soft cloth and mild detergent to ensure proper adhesion. Dry the rod thoroughly‚ especially near the guide locations. Use a hairdryer on a low setting to speed up the drying process. This preparation ensures a smooth and even surface for installing the new guides‚ which is essential for their durability and performance.
3.2 Removing the Old Guides
To remove old guides‚ start by carefully cutting the epoxy or binding material with a fine-tooth saw or utility knife. Apply gentle heat using a hairdryer to soften the adhesive. Once loosened‚ twist the guide gently to detach it from the rod. Avoid applying too much pressure‚ which could damage the rod blank. Remove any remaining epoxy residue with a scraper or sandpaper. This ensures a clean surface for installing new guides‚ promoting a secure and durable bond.
3.3 Cleaning and Preparing the Rod Surface
After removing the old guides‚ clean the rod surface thoroughly. Use acetone or a solvent to wipe away any remaining epoxy or residue. Lightly sand the area with fine-grit sandpaper to ensure a smooth‚ even surface. This step is crucial for proper adhesion of the new guides. Once sanded‚ use a clean cloth to remove dust and debris. Finally‚ wipe the rod with isopropyl alcohol to eliminate any oils or impurities‚ ensuring a clean surface for the new guides to bond effectively.
3.4 Applying Adhesive and Installing New Guides
Apply a small amount of adhesive‚ such as Flex Coat or epoxy‚ to the base of the new guide and the prepared rod surface. Gently press the guide into place‚ ensuring proper alignment. Use a small clamp or rubber band to secure it while the adhesive sets. Allow the adhesive to cure fully‚ following the manufacturer’s instructions. For added durability‚ expose the adhesive to a UV light source if recommended. Once set‚ inspect the guide’s alignment and ensure it is securely bonded to the rod.
Choosing the Right Guides for Your Fishing Rod
Selecting the appropriate guides involves considering factors like rod type‚ fishing technique‚ and line weight. Ceramic‚ stainless steel‚ or titanium guides are popular for durability and performance.
4.1 Types of Fishing Rod Guides
Fishing rod guides vary in materials and designs. Ceramic guides offer smooth line flow and durability‚ while stainless steel guides are robust and resistant to corrosion. Titanium guides are lightweight and ideal for sensitive rods. Single-foot and double-foot guides are common‚ with the latter providing added stability. The choice depends on the rod’s action‚ intended use‚ and personal preference‚ ensuring optimal performance and longevity.
4.2 Factors to Consider When Selecting Guides
When selecting fishing rod guides‚ consider the rod’s intended use‚ material durability‚ and size compatibility. The guide’s frame and ring material should match the rod’s action and expected line strength. Saltwater rods require corrosion-resistant guides‚ while freshwater rods may opt for lighter materials. The guide size should align with the rod’s length and line type to ensure smooth casting and minimal friction. Proper alignment and spacing are also crucial for optimal performance and to prevent line tangles or wear.
Tips for Proper Installation and Alignment
Proper installation requires precise guide alignment and secure adhesion to ensure smooth line flow and durability. Follow manufacturer instructions for optimal results and longevity.
5.1 Aligning Guides for Optimal Performance
Aligning guides is critical for ensuring smooth line flow and preventing tangles. Properly spaced and angled guides enhance casting accuracy and reduce wear on the line. Use a straightedge to maintain consistent spacing and alignment‚ typically following the rod’s original guide placement. Ensure each guide is level and evenly distributed along the rod’s length for optimal performance and durability.
5.2 Securing Guides Properly
Securing guides properly is essential for durability and performance. Apply a small amount of adhesive to the guide’s base‚ ensuring it bonds firmly to the rod. Allow the adhesive to cure fully‚ following the manufacturer’s instructions. Once set‚ inspect the guides to ensure they are tightly fixed and aligned correctly; Properly secured guides prevent shifting during use‚ maintaining consistent line flow and reducing the risk of damage to the rod or line.
Common Mistakes to Avoid During Replacement
Common mistakes include using incorrect adhesives‚ misaligning guides‚ and improper curing times. These errors can damage the rod or reduce performance‚ leading to costly repairs.
6.1 Overlooking Proper Alignment
One of the most critical mistakes during guide replacement is neglecting proper alignment. Misaligned guides can disrupt line flow‚ leading to poor casting performance and increased friction. To avoid this‚ use a straightedge or alignment tool to ensure guides are evenly spaced and straight. Double-check the spacing between each guide‚ as uneven placement can cause line tangles and reduce accuracy. Proper alignment ensures smooth line movement‚ enhancing casting distance and overall fishing efficiency. Always verify alignment before securing guides permanently to prevent costly rework and maintain optimal rod performance.
6.2 Using Incorrect Adhesive or Materials
Using the wrong adhesive or materials when replacing guides is a common mistake that can lead to poor durability and performance. Always use a high-quality epoxy or UV-cured resin specifically designed for fishing rods. Avoid household adhesives‚ as they may not bond properly or withstand environmental stress. Incorrect materials can result in loose guides‚ damaged rod surfaces‚ or weakened bonds. Ensure the adhesive is compatible with your rod’s material and follow the manufacturer’s instructions for application and curing times to achieve a strong‚ long-lasting bond.

Maintenance and Care After Replacement
Regular cleaning and inspection of guides ensure longevity. Use a soft cloth and mild soap to remove dirt. Store rods in protective cases to prevent damage.
7.1 Cleaning and Inspecting Guides
Regularly clean guides with a soft cloth and mild soap to remove dirt and grime; Inspect for cracks‚ wear‚ or misalignment. Replace damaged guides promptly to maintain rod performance. After each use‚ wipe down guides to prevent corrosion. Store rods in a dry place to avoid moisture buildup. Inspect guides before and after fishing trips to ensure optimal functionality. Addressing issues early prevents costly repairs and enhances fishing experiences. Proper care extends the lifespan of your fishing rod guides‚ ensuring consistent performance.
7.2 Regular Maintenance Routine
A consistent maintenance routine ensures your fishing rod guides remain in top condition. Schedule regular inspections every few months or after heavy use. Clean guides thoroughly‚ removing any debris or grime. Apply a thin layer of silicone spray or rod wax to keep them lubricated. Store rods in a protective case to prevent accidental damage. Avoid exposing guides to harsh chemicals or extreme temperatures. By adhering to this routine‚ you can prevent wear and tear‚ ensuring your guides function smoothly for years to come.
Cost Considerations for Guide Replacement
Replacing fishing rod guides can range from $10 to $50 for DIY kits‚ while professional services may cost $50 to $150‚ depending on materials and labor quality.
8.1 Budgeting for Materials and Tools
Budgeting for guide replacement involves estimating costs for materials like guides‚ adhesives‚ and thread. Tools such as cutters‚ sandpaper‚ and applicators may add to expenses. Prices vary based on quality and brand. For instance‚ a set of high-quality guides can range from $20 to $50‚ while basic tools might cost another $10 to $30. Planning ahead ensures you stay within budget without compromising on essential items. Researching options helps balance quality and affordability effectively for the best results.
8.2 Professional vs. DIY Replacement Costs
Professional guide replacement typically costs between $50 to $150‚ depending on the rod’s quality and number of guides. DIY replacement is more affordable‚ with materials costing $30 to $80. Professionals offer convenience and expertise‚ ensuring precise alignment and durability. However‚ DIY saves money and allows anglers to customize their setup. The choice depends on personal skill level‚ time availability‚ and budget priorities‚ making it important to weigh these factors for the best decision.
Troubleshooting Common Issues Post-Replacement
Identifying and addressing issues like misaligned or loose guides is crucial for optimal performance. Quick fixes and adjustments ensure the rod functions smoothly‚ maintaining its longevity and efficiency.
9.1 Addressing Misaligned Guides
Misaligned guides can disrupt line flow and casting accuracy. To fix‚ carefully inspect each guide‚ ensuring proper alignment with the rod’s spine. Gently adjust or reposition guides using a small tool or adhesive. If misalignment persists‚ consider re or consulting a professional. Proper alignment ensures smooth casting and prevents wear on the line and rod‚ enhancing overall fishing performance and durability. Regular checks and minor adjustments can prevent major issues‚ keeping your rod in optimal condition for years.
9.2 Fixing Loose or Damaged Guides
Loose or damaged guides can compromise casting performance and line integrity. Inspect the guides for any visible damage or wear. For loose guides‚ apply a small amount of adhesive to secure them‚ ensuring proper alignment. If a guide is damaged‚ remove it carefully and replace it with a compatible model. Use a soft cloth to clean the area before applying new adhesive. Avoid overtightening‚ as this could damage the rod. Regular maintenance and inspections can prevent such issues‚ ensuring your rod remains in optimal condition for consistent fishing performance.
Replacing fishing rod guides is a straightforward process that enhances performance and extends the life of your rod. By following proper techniques and using the right materials‚ anglers can ensure their gear functions optimally. Regular maintenance and inspections are key to preventing issues. Whether you’re a seasoned angler or a beginner‚ understanding guide replacement empowers you to maintain your equipment effectively. With the right care‚ your fishing rod will deliver consistent results‚ helping you take your fishing experience to the next level.