Delta 4-in-1 Crib Instructions Manual: A Comprehensive Guide
Navigating assembly can be tricky; this guide simplifies the process for Delta’s 4-in-1 cribs, referencing resources like ManualsLib and Reddit discussions․
Understanding the Delta 4-in-1 Crib
Delta 4-in-1 cribs are designed for longevity, adapting to your child’s growth through four distinct stages: newborn, toddler, daybed, and full-size bed․ This versatility makes them a popular choice for parents seeking a long-term sleep solution․ However, the conversion process and initial assembly can present challenges, as highlighted in online forums like Reddit’s r/instructionmanuals, where users share experiences with models like the Chesapeake Panel Crib․
Understanding the core components and how they interact is crucial; These cribs typically feature adjustable mattress heights, allowing you to lower the mattress as your baby begins to sit and stand․ The conversion kits, often sold separately, enable the transition to toddler, daybed, and full-size configurations․ Resources like ManualsLib offer downloadable assembly instructions for specific models, such as the Skylar 4-in-1 Crib, providing detailed diagrams and step-by-step guidance․ Careful review of these materials is highly recommended before beginning assembly․
Crib Model Variations & Identifying Your Model
Delta Children offers a diverse range of 4-in-1 crib models, including the Chesapeake, Skylar, and Adley, each with potentially unique assembly requirements․ Identifying your specific model is the first step towards successful assembly․ Locate the model number, typically found on a sticker affixed to the headboard or footboard, or within the included documentation․
Referencing this number when searching for instructions on ManualsLib ensures you download the correct manual․ Online communities, like the Reddit discussion mentioned, often specify the model they’re referencing, allowing for targeted assistance․ Variations can exist even within a model line, so precise identification is key․ Ignoring this step can lead to frustration and incorrect assembly, potentially compromising safety․ Always prioritize using the manual specifically designed for your crib model․

Safety Precautions & Important Warnings
Prioritize safety throughout the assembly and use of your Delta 4-in-1 crib․ Always follow the manufacturer’s instructions meticulously․ Ensure all hardware is securely tightened to prevent instability and potential hazards․ Regularly inspect the crib for loose screws, bolts, or any signs of damage․
Never alter the crib’s structure or use unauthorized replacement parts․ Adhere to the weight limits specified in the manual for each configuration – newborn, toddler, daybed, and full-size bed․ Be mindful of entrapment hazards; ensure proper spacing of slats and avoid placing soft bedding or toys in the crib with infants․ A Reddit user highlighted design frustrations, emphasizing the need for clear instructions to avoid errors impacting safety․

Assembly Process: Step-by-Step Instructions
Begin with careful unboxing and parts verification, then systematically follow the manual’s guidance for frame assembly and mattress support attachment․
Unboxing and Parts Inventory
Carefully open the crib packaging, taking care not to damage any components with a box cutter or similar tool․ Lay out all parts on a protected surface – a drop cloth or cardboard is ideal – to prevent scratches․ Consult the parts list included in your Delta 4-in-1 crib’s manual․
Verify that all listed items are present before proceeding․ This includes side rails, headboard, footboard, mattress support, hardware packets (screws, bolts, dowels, etc․), and any conversion kit pieces․ Pay close attention to screw sizes and types, as they are often different․
Reddit users have noted design frustrations, so a thorough inventory now can save significant time later․ If anything is missing, immediately contact Delta Children’s customer support (see the ‘Finding Replacement Parts’ section) before attempting assembly with incomplete materials․ Document any discrepancies with photos for easier communication․

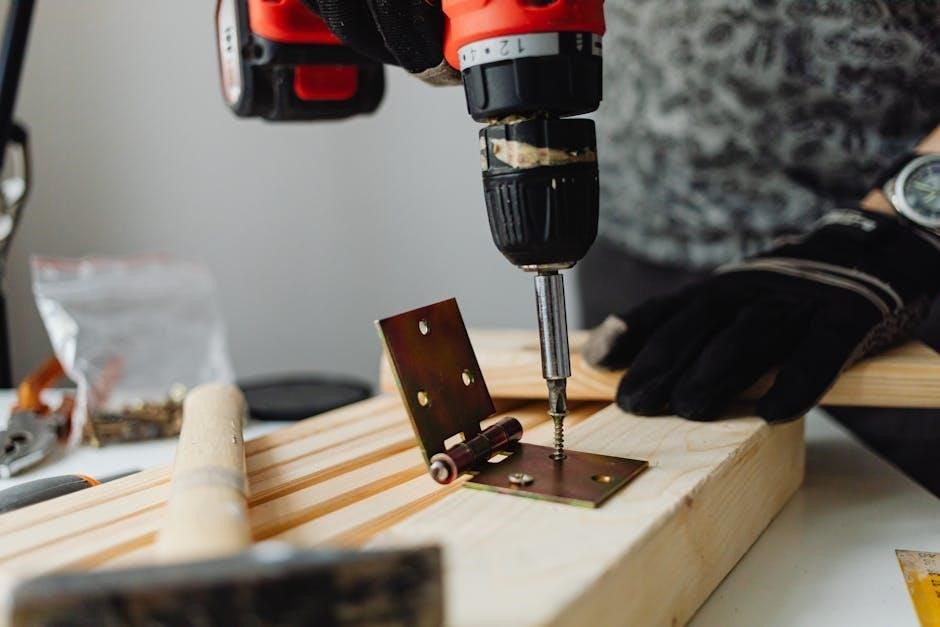
Assembling the Crib Frame
Begin by attaching the side rails to the headboard and footboard, utilizing the provided bolts and dowels․ Ensure proper alignment – a common issue reported on r/instructionmanuals – before fully tightening․ Hand-tighten initially to allow for adjustments․
Refer to the diagrams in your manual for correct orientation of each piece; some rails may be specific to either side․ Double-check that all connections are flush and secure․ Once aligned, use the appropriate wrench to tighten the bolts firmly, but avoid over-tightening, which could strip the screw holes – another frequently mentioned problem․
A stable frame is crucial for safety, so take your time and verify each connection․ If encountering difficulty, revisit the parts inventory and ensure you’re using the correct hardware․ Consider a second person to assist with holding pieces in place during assembly․
Attaching the Mattress Support
Once the crib frame is fully assembled and stable, proceed with attaching the mattress support․ This typically involves inserting the metal support beams into designated slots within the side rails․ Ensure the support is level and securely seated in all slots before proceeding․
Delta cribs often offer adjustable mattress heights; select your desired level based on your baby’s developmental stage․ Confirm the chosen height is locked in place using the provided hardware – typically screws or locking pins․ Regularly check this locking mechanism during maintenance․
Proper mattress support is vital for infant safety, preventing gaps where a baby could become entrapped․ Verify the support is flush with the crib frame and that there are no protruding edges․ Refer to the manual for specific weight limits and support configurations․

Converting the Crib: 4 Configurations
Delta’s 4-in-1 design offers versatility, transitioning from a newborn crib to toddler bed, daybed, and ultimately, a full-size bed configuration․
Newborn Crib Mode
Establishing the initial newborn crib setup is paramount for infant safety and comfort․ Ensure the mattress support is securely positioned at the highest setting, specifically designed for newborns․ This configuration maximizes safety by preventing accidental falls and simplifies access for tending to your baby․ Double-check all bolts and screws are tightened according to the assembly instructions, verifying a stable and secure frame․
Maintain a firm, flat mattress that fits snugly within the crib’s dimensions – no gaps should exist between the mattress and the crib sides․ Avoid using soft bedding, pillows, or bumpers, as these pose suffocation hazards․ Regularly inspect the crib’s structure for any signs of wear, looseness, or damage․ Prioritize a minimalist approach to the crib’s interior, focusing solely on a fitted sheet to create a safe sleep environment for your little one․
Toddler Bed Conversion
Transitioning to the toddler bed phase requires careful disassembly and reconfiguration of the crib․ Typically, this involves removing one side rail, utilizing the included toddler guardrail for safety, and lowering the mattress support to its lowest position․ Ensure the conversion kit components align precisely with the existing crib structure, securing them firmly with the provided hardware․
Prioritize a stable and secure setup, as toddlers are more mobile and prone to climbing․ Regularly inspect the guardrail’s attachment and overall stability․ Consider placing a soft rug or playmat around the bed to cushion potential falls․ It’s crucial to supervise your toddler during the initial adjustment period to ensure they adapt safely to the new bed configuration, fostering a secure and comfortable sleep environment․
Daybed Configuration
Converting your Delta 4-in-1 crib into a daybed offers a versatile sleep and play space for your growing child․ This usually involves removing both side rails and positioning the mattress support at its lowest setting․ The resulting open-sided structure creates a comfortable lounging area, perfect for reading or quiet playtime during the day․

Always ensure the mattress is securely positioned within the frame to prevent accidental falls․ Consider adding soft cushions and pillows to enhance comfort and create a cozy atmosphere․ Supervise your child closely when using the daybed, especially during initial use, to ensure they understand the boundaries and safety precautions․ This configuration provides a transitional step before a full-size bed․
Full-Size Bed Conversion
The final stage of your Delta 4-in-1 crib’s evolution is the full-size bed conversion, designed to accommodate your child’s continued growth․ This typically requires a separate full-size bed frame and a box spring, which are not included with the crib․ You’ll reuse the headboard and footboard from the crib, attaching them to the new bed frame․
Carefully follow the instructions provided with the bed frame for proper assembly․ Ensure all connections are secure and stable before allowing your child to use the bed․ This conversion offers a familiar and comforting transition to a larger sleeping space, utilizing the cherished components of their original crib․ Regularly inspect all connections for tightness and safety․

Troubleshooting Common Assembly Issues
Reddit users highlight frustrating design flaws, but clear instructions can help overcome alignment problems, missing parts, or stripped screw holes during assembly․
Difficulty Aligning Parts
Encountering misalignment during Delta 4-in-1 crib assembly is a common frustration, as noted in online discussions․ Often, this stems from not loosening bolts sufficiently before attempting to connect larger frame pieces․ Ensure all screws are initially backed out a few turns to allow for necessary adjustments and flexibility during the joining process․
Double-check that you’re using the correct hardware for each connection point; the manual details specific screw types for different areas․ Applying gentle, even pressure is crucial – avoid forcing parts together, as this can damage the wood or strip the screw holes․ If parts still resist alignment, try slightly shifting the position of adjacent components while gently applying pressure․
Remember to review the diagrams in the instruction manual carefully, paying close attention to the orientation of each piece․ Sometimes, a simple reversal of a panel can resolve alignment issues․ If persistent, temporarily loosen all connected bolts in the area to allow for a complete reset and realignment attempt․
Missing Hardware
Discovering missing hardware within a Delta 4-in-1 crib kit is unfortunately not uncommon, prompting many to seek assistance online․ Before panicking, meticulously re-check all packaging materials – smaller parts are easily overlooked․ Compare the contents against the parts list in your instruction manual to confirm exactly what’s absent․
If a piece is genuinely missing, your first recourse is Delta Children’s customer support (see the ‘Finding Replacement Parts’ section)․ They typically offer replacements free of charge, though you’ll likely need your crib model number and proof of purchase․ Alternatively, online retailers specializing in furniture hardware may carry compatible replacements․
As a temporary measure, if the missing part isn’t critical for structural integrity, you might cautiously proceed with assembly, noting the omission․ However, do not substitute hardware with non-approved alternatives, as this could compromise safety․ Always prioritize obtaining the correct replacement part from Delta or a reputable source․

Striped Screw Holes
Encountering stripped screw holes during Delta 4-in-1 crib assembly is a frustrating, yet frequently reported issue, often highlighted in online forums like Reddit․ This typically occurs from over-tightening screws or applying uneven pressure during installation․ Avoid forcing screws; if resistance is felt, stop immediately․
For minor stripping, try using a slightly larger screw of the same type․ Wooden toothpicks or small wood shims inserted into the hole alongside the screw can also provide a tighter grip․ However, never use excessive force, as this could further damage the wood․
If the stripping is severe, contact Delta Children’s customer support․ They may offer replacement parts or guidance on repair options․ Do not attempt to repair extensively damaged holes yourself, as this could compromise the crib’s structural integrity and safety․ Prioritize a secure and stable assembly․

Maintenance and Care
Regular upkeep ensures lasting safety and functionality; inspect frequently for loose hardware, clean gently, and address issues promptly for continued peace of mind․
Cleaning Instructions
Maintaining a hygienic sleep environment for your baby is paramount․ For routine cleaning of your Delta 4-in-1 crib, a damp cloth with mild soap is generally sufficient․ Avoid abrasive cleaners, as these can damage the finish and potentially pose a hazard to your child․
Ensure the crib is completely dry before placing your baby back inside․ For stubborn stains or spills, a slightly more concentrated soap solution can be used, but always rinse thoroughly with a clean, damp cloth afterward․
Never use harsh chemicals, bleach, or ammonia-based products․ These can be toxic and leave harmful residues; Periodically check all surfaces for any signs of damage or wear, and address them promptly․ Remember to always prioritize safety and cleanliness when caring for your baby’s crib․
Regular Inspection for Safety
Consistent safety checks are crucial for your child’s well-being․ Regularly inspect the Delta 4-in-1 crib for any loose hardware, including screws, bolts, and slats․ Pay close attention to the mattress support, ensuring it remains securely attached and level․ Examine the crib’s finish for any cracks, chips, or peeling paint, which could present a choking hazard․
Check the side rails and headboard/footboard for stability, ensuring they are firmly connected to the frame․ Verify that all moving parts, such as the drop-side mechanism (if applicable), operate smoothly and lock securely․
Address any identified issues immediately․ A proactive approach to inspection can prevent potential accidents and ensure a safe sleep environment for your little one․ Prioritize safety above all else during these routine checks․
Tightening Loose Hardware
Maintaining a secure crib is paramount for safety․ Periodically, hardware can loosen with normal use, requiring tightening․ Use the appropriate tools – typically an Allen wrench or screwdriver – to firmly secure all screws, bolts, and fasteners․ Avoid over-tightening, as this could strip the screw holes or damage the wood․
Focus on the areas connecting the side rails, headboard, footboard, and mattress support․ Regularly check these points, as they bear the most stress․ If you encounter stripped screw holes (a common issue noted in online forums), consider using wood glue and toothpicks to reinforce the hold before re-inserting the screw;
Consistent tightening prevents wobbling and ensures stability․ A well-maintained crib provides a safe and secure sleep environment for your child․

Finding Replacement Parts
Lost or damaged parts are easily replaced through Delta Children’s support or online retailers, ensuring your crib remains safe and functional․
Delta Children Customer Support
Reaching Delta Children’s customer support is a crucial step when encountering issues with your 4-in-1 crib, particularly regarding replacement parts or assembly clarification․ Their dedicated team provides assistance via multiple channels, ensuring a responsive and helpful experience․ You can typically find contact information – including phone numbers and email addresses – directly on the Delta Children website․
Be prepared to provide your crib’s model number and purchase date when contacting support; this streamlines the process and allows them to quickly address your specific needs․ Many users have reported positive experiences with Delta’s support team, highlighting their willingness to resolve problems efficiently․ Don’t hesitate to utilize this resource if you’re struggling with assembly, missing components, or require guidance on converting the crib to different configurations․ They are equipped to handle a wide range of inquiries and offer valuable assistance․
Online Retailers for Replacement Parts
Locating replacement parts for your Delta 4-in-1 crib can often be efficiently achieved through various online retailers, supplementing Delta Children’s direct support․ Major e-commerce platforms like Amazon and eBay frequently stock a wide array of crib parts, including screws, bolts, and even entire side rails․
When searching, it’s vital to have your crib’s model number readily available to ensure compatibility․ Specialized baby furniture parts retailers also offer a focused selection, potentially providing more specific or hard-to-find components․ Always verify the retailer’s return policy before purchasing, and carefully compare part numbers to avoid ordering incorrect items․ Checking online forums and Reddit communities (like r/instructionmanuals) can also reveal valuable insights from other Delta crib owners regarding reliable sources for replacement parts and helpful tips․